▲Slide the Pre-drilled threaded fastener through the installation material
▲Rotate the nut onto the fastener(slotted portion away from the installation material)
▲Apply the appropriate torque to the nut
▲If the bolt has no hole, once it is torqued properly drill a hole between two of the slots
▲Rotate the nut +/- 30% to align the hole with the slots in the nut
▲Slide the cotter pin through the slots, into the hole and out the other side
▲Using pliers, bend the cotter pin so that it cannot freely come out of the hole


▲Check the fastener assembly to ensure the cotter pin is in place
▲When removing the nut, bend or cut the cotter pin so it can be removed
▲When re-installing, use a New cotter pin
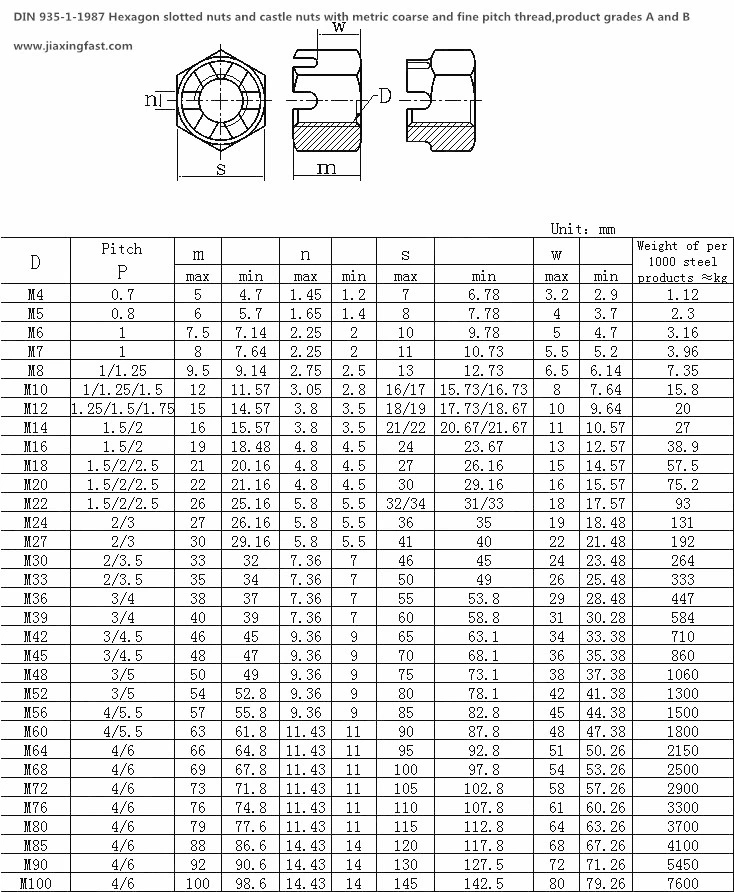 Slotted Hex Nuts are hex nuts with slots protruding from the top, similar to castle nuts. To use a slotted nut, a hole is drilled through the threaded portion of a bolt or stud. A cotter pin is then placed through the slots and hole and deformed so it cannot easily be removed. This creates a locking effect that prevents the nut from spinning free of the bolt or stud. Slotted nuts are similar to castle nuts but usually have a lower profile than a castle nut of the same size. Slotted hex nuts are generally preferred to castle nuts due to their lower profile. The cotter pin locks the slotted nut into place, which eliminates the need for other locking-type fasteners. This means no lock washers are needed when using a slotted nut.
| Product name | Stainless Steel Hexagon Slotted Nut |
| Standard | DIN935 |
| Material | SS304, SS316 |
| Specification | M4.6-M48 |
| Head shapes | Round head |
| Screw thread | Coarse thread |
| Screw tip | Flat point |
| Finish | A2-70/A2-80/A4-70/A4-80 |
| Features | Good anti-corrosion ability |
| Grade | A2, A4 |
| Certification | ISO9001:2008, SGS, RoHS, Bureau Veritas |
| OEM service is also available | |